Categories
Wednesday, 28 March 2007
Week 4 - Forum
The first one, David Dowling talked about the collaboration between Metallica and the San Fransisco Symphonic Orchestra. The project (according to David) was the idea of Michael Kaman, who had worked with Metallica before in their 1991 album. To fuse the thrash-metal music of Metallica and classical music of that orchestra has not been done many times yet. And this particular one has been a significant one in the past decade. Personally I liked this presentation the best. Although I did not agree with all David said, the way he expressed his opinions or rather got us acquainted with different aspects of that project was really good.
Vinny Bhagat talked about an Indian musician called Trilok Gurtu who is a percussionist in the first place, and he has done many different collaborations with western musicians. I didn't know anything about this particular individual or his music but during the session I realised that he has come up with many stuff which would really help me to broaden my views and understanding of music generally. Vinny played a number of Trilok's tunes which were definitely good examples of ways musicians could collaborate with each other and come up with a new result.
William Revill talked about how music could possibly collaborate with other sorts of art in general. He was focused on the role of music in computer games and he went through few details in order to briefly clarify the issue for us. Unfortunately (I think because of the limitations that the session's time had) I couldn't get enough information as much as I needed but it was the first day of presentations and none of us completely knew what was supposed to go on.
After that it was me! I really did a very very bad presentation which led to a complete chaos. I couldn't express my point (which was about the collaborations so-called "world music") and my plan to involve other students in a discussion totally failed. Some individuals were disappointed and called my job "pointless". I agree with them but that was the best I could do.
I have put the writing I had for my presentation here. This writing is more related to my actual point compared to what happened during the session.
Monday, 26 March 2007
Week 4 - CC
After importing all the .wav files I had from the last session, I used the two tracks “Chafe Deformed” and “Wave Deformed” as intros, however, as shown in the score, the “Wave...” enters in the 3rd measure. I left these two unchanged and just in the last bar of the intro; I added some effect to the “Chafe…” by deleting 4 parts of the track. Each of the deleted regions had duration of 1/32nd. For the sequence to be precise and quantised, I needed to switch to “Grid mode” and set its value to either 1/16th or 1/32nd.
I cut a region of the .wav file “Pull from 2 sides deformed” with duration of 1/16th and took a treble percussive sound out of it. Playing a kind-of “Rumba” rhythm, I used the “grabber” while holding the button Alt to copy and paste the same sample I had made in a quantised figure and make a rhythm pattern. After having the first 4 bars, I simply copied those 7 more times till the end of the sequence.
The initial tempo was 120 and I changed it to 90bpm.
For the bass drum part, I applied the same procedure of the hi-hat (treble perc.) sound but on the file “Scratch deformed” and I patterned a different rhythm. I also used the EQ and the compressor on this track since the region I had chosen had too much of high frequencies; it was supposed to be the bass drum.
For snare, I used the file “Rumple deformed” with duration of 1/8th playing on beats 2 and 4 of each bar and having rests on the 1st and 3rd beat. This time, I didn’t copy-paste anything. I just deleted the 1st and 3rd beats of each bar so the snare part was not a simple repetitive sound. I used the compressor on this track as well.
As sort-of a solo!, I utilised the file “Tear deformed” and just made a pattern on it by deleting several regions of the track with durations of 1/16th, 1/32nd and 1/64th. At the end of this particular track, I applied a fade out.
The score for this sequence is as shown below:

And this is the final audio result:

Week 4 - AA
Here is the simplest way I could possibly exlpain how inputs and outputs work in the studio and how they are connected. However, there are few exceptions to this scheme. I'll explain it at the end of this post.
 To view the enlarged image, please do not hesitate to click here.
I checked the connections and found out that there also were wires going out of the wall bays directly to the Protools hardware. But most of the outputs of the wall bays were going into the patchbay as shown above.
I do not assume that the figure is correct and I strongly need to review the entire session again.
Tuesday, 20 March 2007
Week 3 - Forum
We had percussionists (including me), singers, guitarists and keyboard players who were supposed to play not on an exact beat but within an exact period of time. The result might have been sounding like a disorganised noise-making by bunch of people. It particularly was not. The obligation to follow some rules –however not like other music sheets’ rules- made the performers to pay attention to what they were playing. In contrast, the fact that we were free to play in an assigned period of time made us (at least myself) to think of coming up with the most creative sound possible. We played this THING (which definitely WAS music to me personally) for 45 minutes after which we discussed about and expressed our views on it.
Personally I think the debate that followed the performance was a great result. Some individuals didn’t agree with the idea that the act was interesting, and some (again including me) found it very impressive and inspiring.
Over all, what we played sounded to me like early works of the band King Crimson and in some senses Pink Floyd (when Syd Barrett was in the band). It wasn’t new to me but I surely liked what we did.

Experimental music is defined in Wikipedia as any music that challenges the commonly accepted notions of what music is. The actuality that its concept would never be recounted by one particular definition, makes it the most interesting and beautiful for me.
Throughout years, whoever has come up with a new idea (especially in early stages of modernism) has been criticised by others who tended not to change what they believed as “facts”. Even Stravinsky sustained harsh reactions against what we now assume as rather “classical” artworks.
In recent years, we have had individuals such as Masami Akita who have based all their “music” upon “noise” and nothing else. His works in Merzbow are controversial and I am pretty sure that many people would not consider him as a musician at all.

My point is this; since we are living in a rather post-modern era, it is one of our basic needs and abilities to accept new aspects of art, or so-called inventions, or anything different from what we have had in the past. “Standing on the shoulders of giants” is not just for high-level intellectuals or scientists anymore. This is a reality of our time not just to acknowledge new (and in many cases unpleasant) creations, but also to try to create, introduce new ideas, and break the past’s rules.
PS: This particular post needed way more intelligence than my ability in writing in English. Please excuse me since this is my second language.
Week 3 - CC
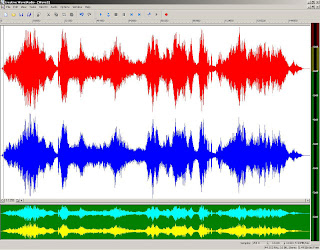 1: Scratch Sample. I used the “lasso partial select” of the software and copied various parts of the frequency range and pasted to other parts.
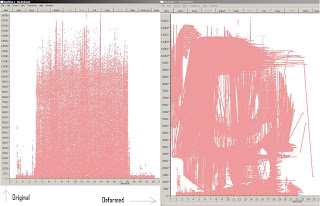 I also used the time stretch for some other partial selections of mine and changed their duration. The graphical simulation of both original and deformed samples are shown here as well as the deformed samples’ wave file:
Click "Download" to hear the sample.

2: Pulling the paper from 2 sides. Using the tool “frequency flip”, I gave more of the frequency density to the higher range.
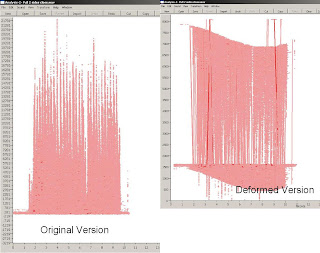 Followed by that, I cut the upper range of the frequencies (since it was too high and not really audible) and shifted it to the lower frequency range. For this, I utilised the “frequency transform” tool.
3: Waving the paper. For this sample, I shifted various frequency ranges both vertically and horizontally, then stretched times of some regions (not the entire sample)

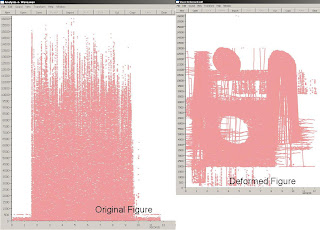
4: Chafe. Firstly I flipped the entire frequency range;
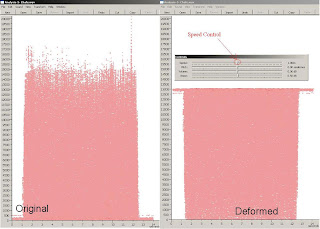 Again frequency-wise, it was pretty high so I transformed the entire region to lower frequencies. Then I recorded the sample in real-time with the Creative editor and played with the speed of the sample using the speed control as shown above:
5: Rumple.
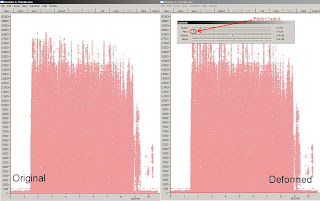 I decreased the speed of the sample (since it was relatively short) then I played it back and while recording real-time, I randomly changed the pitch of the sample using pitch control.
6: Tearing the paper. Using all the applications possible, I flipped the frequency of two different regions of the sample, then copy-pasted two other regions (using lasso), stretched the times of two other regions, shifted the frequency of another region, decreased the speed and finally played with the pitch of the entire sample.
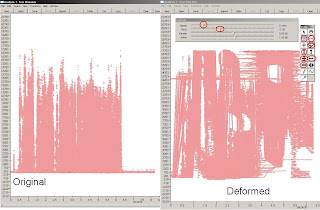 This one is my favourite.
Sunday, 18 March 2007
Week 3 - AA1
Studio 2 is where I was supposed to get acquainted with the process of recording, face the possible problems and eventually resolve them.
In the first session, I couldn’t really do anything because Protools (the software by which I had to record) kept giving me an error message of not having an MBox attached to the computer. In the following day, I figured out that there was no need for an MBox at all.
The second session of mine went on without a Protools at all. The software was not available but I managed to figure out the procedure of working with the facilities in future.
After following the correct order of turning the machines on, (The main power, then the effects, then the mixer, and the monitors) I used an SM57 microphone to record and because I was alone, I decided to use the patch bay instead of the dead room.
Having so many difficulties getting any sound out of the mixer, I eventually went to the internet and read the manual of the Mackie onyx 1640 mixer and as a result figured out what to do.
I sent the microphone to the Insert 1 channel on the patch bay at first, and I needed to assign the channel 1 to be active on the mixer. Pressing both “Main Mix” button next to channel 1’s fader and the main “Main Mix” button of the mixer, I could get the sound of the microphone. Since Protools was down, I just tried to do more with the patch bay and finally send all the signals to any of the inputs of channels of Protools. I could send the microphone signal to the equalizer, then the compressor, and then to any of Protools’ inserts to record. .Mackie Onyx 1640
Wednesday, 14 March 2007
Week 2 - Forum
In our forum, however, we didn’t really discuss about the definition or any sort of expected meaning of originality. Mr Whittington sparked the presentation with the very true fact that if you copy from one individual, you have committed plagiarism; but if you copy from several people, that is a research!
Talking particularly about music, as many other elements of this art are (or could be) defined subjectively, this very concept
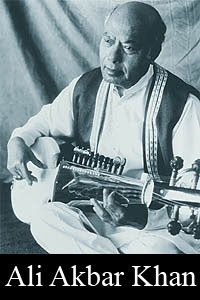 of originality would be different for different people. We were told about Ali Akbar Khan’s story of reforming a traditional piece of music and being punished because of that. Likewise, there are numerous incidents in which several artists had faced difficulties and in cases physical reactions when they tried to utilise their former fellow artists’ artworks to come up with something new (or rather original).
In my opinion, starting from the modernist era there have been many cases that artists would purposely take others’ works, sometimes mix them together, or deform them, or even tease them and bring a “new” idea of that particular artwork without any fear of confrontation. An
 dy Warhol and his famous pop-art works are good examples of this.
Talking about this issue from a complete different aspect, originality could be started with just having an original idea. This definition does not talk about the materials which are going to be used during the application of the idea.
Mr Whittington told us about a quality named “Aura” by Walter Benjamin; a
 German critic and philosopher from the
 French social theorist Jean Baudrillard defines a term of “Simulacrum” as a copy of a copy which has been so dissipated in its relation to the original that it can no longer be said to be a copy.
We also listened to some works of John Zorn, an avant-garde American musician who has a significant role in the history of experimental music.
Despite all the controversy of defining originality, my personal point is whether it is important or not. In the real life, especially nowadays, we come across many particularly
 musicians who basically just “cover” someone else’s artwork and even pay him/her to use their work and a tiny number of the audience think of the fact that at least the idea of that specific song is NOT original.
One part of gaining information is to know what to do, but I also think of the application of the knowledge. I have studied music before, precisely jazz. For all of my assignments I had to basically copy others’ rules and just change the order of chords or notes. I got marks for my tests, but I never consider that work as an original one. The chord progression of
 I, VI, II, V is used in thousands of songs throughout the world. What makes one original (or at least originally to majority of the audience) at the present time is in most of the cases not musical at all. I think as the time changes, and so do our perceptions and conception, the way we (the audience) think or rather pay attention to an artwork would necessarily change as well.
For me an original artwork means “An artwork which affects the audience in a new (and preferably unique) way, regardless of the origins of the material used in it.”
References:
. Wikipedia (http://www.wikipedia.org)
. The official Ali Akbar Khan webpage (http://www.ammp.com)
. Mark Harden's art archive (http://www.artchive.com)
. The Walter Benjamin research syndicate (http://www.wbenjamin.org)
. Stanford University (http://www.stanford.edu)
. John Zorn's website (http://www.omnology.com)
. University of California Santa Cruz (http://www.ucsc.edu)
. Andy Warhol museum (http://www.warhol.org)
. La Central - Barcelona (http://www.lacentral.com)
. Philosophy and its heroes (http://www.filosofico.net)
. The University of Chicago (http://www.uchicago.edu)
. Google images (http://images.google.com)
Monday, 12 March 2007
Week 2 - CC1
In addition to that, we were told of how to “snap shot” our work using the abilities of Mac OS.
In Studio 5 of the EMU, I used Protools to record the track;
I chose a Shure SM58 microphone and a female XCR > 6.5mm cable for the recording.
I recorded the entire track, and then used markers to specify the regions on the track. Although at the end of it, I faded the whole track out, I didn’t use it afterwards and the fade you see below in this picture basically got deleted afterwards.

To create different regions for the track, I just had to choose the option (in the picture below) of separating the regions or I could just press alt+E on the keyboard. After this I had my regions separated and specified.
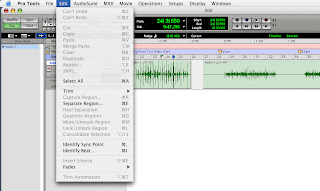
After finishing the recording, I bounced the track to a .wav file to be able to edit it later at home using a PC.
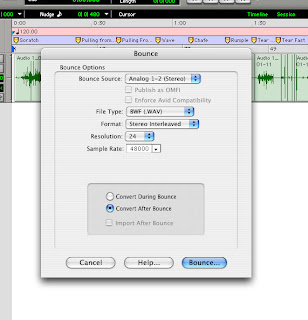

At home, using Sony Acid Pro 6, I basically utilised the option of “Chopper” and as its name shows, I just chopped (or cropped) the regions I had made and rendered each of them to a separate wave file.

At the end, I just converted all of the files to Mp3s and put them here.
Note: It would take a bit of time for these to be played.. be patient please..
Sample 1: The sound of scratching a paper:

Sample 2: The sound of pulling the paper from both sides, close to the microphone:

Sample 3: The sound of waving the paper:

Sample 4: The sound of chafing the paper:

Sample 5: The sound of rumpling the paper:

Sample 6: The sound of tearing the paper:

Sunday, 11 March 2007
Week 2 - AA1
This week’s session was about the basic procedures of recording. Talking about several points which are supposed to be considered before, during and after the recording session, Steve also talked about the order of doing each step.
The process of getting prepared for a recording is almost as important as the recording itself. One part of the role of a producer, an engineer or probably an assistant is to note exactly what they have to do and when they have to do it.
In this session, however, we particularly were receiving information about the duties of the engineer in a studio in a recording session.
Many of the following points are taken from the session’s reading material, “The Session Procedures”:
Firstly, the engineer is supposed to get acquainted with the kind of music which is going to be recorded, its instrumentation, preferably the musician(s) and the band, and the producer. Then, he/she has to provide a recording order, which is not necessarily pre-set and it could differ for different recording procedures. In the reading material, there was an example of the recording order divided into loud rhythm instruments, quite rhythm instruments, main and back up vocals, overdubs and sweetening. This order would obviously be different if the engineer has another plan in mind or there is a totally different instrumentation for the band. It is notable that using the MIDI technology would have another story and recording in a
The next step is to assign instruments to tracks. Although nowadays there are numerous ways of recording and several types of studio hardware, software, console, etc. are available, the reading took an example of a 4-track recording and took a small band as the performers. The main point of the track-assigning process is to have a more accurate recording and to be able to observe each instrument’s involvement in the recorded tune.
Surely, the more tracks available, the more accuracy the engineer could have dealing with the music.
Commonly-used computer softwares have more than 8 tracks these days and not only they can process the recorded material, but they are capable of providing the space for the engineer/producer to add any kind of electronic sounds/noises, effects, samples, etc. as overdubs to the music.
One of the most popular softwares is Digidesign’s Pro-Tools. It initially provides 32 simultaneous tracks for recording as well as 128 so-called “Virtual Tracks”. It is one of the most powerful recording softwares and has gained enough reputation throughout all the years within studios, home studios, producers, etc. More information on Pro-Tools is on its internet website.
Getting back to the subject of the recording process, after planning for the way the engineer intends to use the available tracks, he/she would prepare a session sheet in which containing information about the instruments, their respective assigned tracks and for instance the microphones used for each instrument. In case the engineer decides to record more than one take and choose the best out of them (which the reading material recommends to do) there should be a note indicating the best (or the chosen) record take on the session sheet.
The engineer could prepare a production schedule and include the sequence of recordings and overdubs afterwards. Information regarding the tracks specified for each instrument is also used in professional studios to organise the entire recording session even more. In a DAW (Digital Audio Workstation) however, the information could be entered on screen.
To indicate what input would be used for each particular instrument’s recording and also the microphone used for each instrument, the engineer would provide a microphone input list. Nevertheless, it is notable to remember that the one who judges what sound for what instrument is needed, is the producer and the engineer has the duty of providing the most accurate sound desired by the producer.
Before the actual process of the recording begins, the engineer has to make sure that some certain jobs are perfectly done as far as:
- The position of the instruments, baffles, microphones and headphones, isolating booths, etc.. are in a way that no musician feels uncomfortable and they could do their best in the shortest amount of time. Time IS always money, especially in a studio!
- All the cables and other elements should work properly and if possible, there should be spare equipments available in case anything goes wrong. The inputs and other connecting-issues should be clearly specified and tested (for example at least with a little scratch on the microphone to check its condition.)
- The recording room should be clean and neat and there should be enough space for any probable movement of performers and/or a change of equipments’ position.
- The control room should be totally prepared for which the engineer might need another sheet as a checklist. This would contain points such as checking the patch panel, the names of the tracks which are supposed to be recorded, having all the faders’ levels set on minimum, checking the monitors, etc..
A brief example of a typical order of events in a recording session would be to record the basic tracks, do the overdubbing, mix them and edit and master the final set of tracks.
It should be noted to always keep some blank tracks (especially when using a DAW, in which having blank tracks are easier) to be able to edit, re-record, or add small elements to the music when needed. It is a wise idea to have several takes of a particular part of the tune and edit and composite it later to have a more accurate and a neater take of it.
When the recording session is finished, all the equipments are supposed to be set back to their initial condition. (for instance, microphones are to be back to their cases, cables to their store place, etc..).
In some cases some consoles (and most of the DAWs) can save the control settings and these could be recalled later in other sessions.
Overall, the engineer must prepare a “Session Plan” for the entire recording process. This includes information about the inputs, microphones or DIs considered for each instrument and the track number in which the instruments are being recorded into. A basic example of a session plan is provided below.
The exact definition of a DAW was needed in some ways. I couldn't find it in the writing, therefore I linked the DAW part of this post to Wikipedia which might not be THE most accurate source to get a technical definition as this particular one.
In one part of the writing, it was mentioned that stripes would be used on mixers in order to name the tracks. Apart from softwares these days, a considerable percentage of mixing consoles are digitally controlled in which way you basically type the name of the track you want underneath its respected fader. Two examples of this kind of consoles are Klotz Digital's AEON and Yamaha's M7CL.
Surely there is an approximate estimated time period for an example recording session, for instance it could be 5 hours of studio for 3 tracks of a 4 piece rock band. Although such estimation would be so general but I believe it might give a kind of imagination of how the time in a studio should be taken care of. There was no such thing in the reading material.
In one part, the "Session Procedures" talks about putting back the cables and sorting them out after the recording in which it recalls the term "Lasso Style" of wrapping the cables. I could find neither an exact definition nor a picture of this on the net. I think it would be better if there were some illustrations of this particular method (or other methods commonly used) of how to wrap cables.
**
Wednesday, 7 March 2007
Week 1 - Forum
We got divided to few groups and each group has to present a discussion and its opinions on the determined subject on a certain date.
The new incident in this session was that all of us (degree, diploma, and certificate) students introduced ourselves and it was an opportunity to know others better. In fact, I personally was impressed by words of some of my classmates.
The course is basically under the supervision of Mr Whittington and I look forward to see how it goes.
Tuesday, 6 March 2007
Week 1 - CC1
.

There were some information about the operating system of our laboratory in which we are using apple computers. Mac OSX 10.4 also called "Tiger" and some of the its properties - such as AMS (Audio Midi Setup), the application of "buffer" and the importance of it were discussed in the class.
The buffer has a notable role in the process of recording as it could prevent the possible errors of latency in a recording and playing-back process. To have the minimum latency in recording, it is better to have the lowest-possible buffer; whereas in the playback time, it is better to have a bigger buffer.
I was also told to set this blog up and start building a portfolio via it. Although late, I finally send this very first post and these would be continuing..
